Dashboard
Association area
First steps
My account
Support
Professional area
First steps
My account
Collaborator management
Support
User area
First steps
My account
Projects
Embedded tools
Support
Welcome to the Square Project documentation
Welcome to the Square Project documentation
Discover our comprehensive documentation, designed to meet the needs of all our users. Select the area that matches your profile and access the guides relevant to you.
Why use this documentation?
Our documentation is designed to help you get the most out of Square Project. You will find:
- Detailed explanations of all features
- Tips to optimize your use of the platform
- Step-by-step guides with screenshots and videos
How to navigate?
Use the left sidebar menu to access the different sections. You can also:
- Click on the cards above to go directly to the documentation for each area
- Navigate between the different sections using the buttons at the bottom of each page
Need help?
Can't find the answer to your question in our documentation?
Our support team is available to help you solve all your technical issues.
Create an Association account
- Access the login page
Go to the Square Project login page. - Click on 'Create an account'
On the login page, click on the 'Create an account' link. - Select 'Create an association account'
On the registration page, click on 'Create an association account.' - Fill in the registration form
- Association name : Enter the exact name of your association, as declared to the authorities.
- Purpose : Describe the main activity of your organization.
- Domain name : Enter your association's domain name (without 'www').
- Phone number : Enter the association's phone number.
- Head office address : Enter the exact address of the head office.
- Password : Choose a secure password.
- Read and accept the Terms of Use
- You can read the terms of use by clicking on the provided link.
- Check the box to accept the Terms of Use.
- Validate account creation
Click on the 'Create an account' button. - Confirm your email address
A confirmation email will be sent to you shortly.
Follow the link in this email to activate your account and access your association area on Square Project.
Note: Square Project offers free non-profit licenses to non-profit associations, to support those working for the public good.
Validation procedures
- Check your validation email
If you have received the validation email and validated your account, you can proceed to the next step. - Retrieve your alias
Copy your alias (it is in the validation email). This alias allows you to log in. - Log in to your space
Enter your alias and password to log in. - Fill in the validation form
Once logged in, fill in the form so our team can verify your information.- Check the information entered during registration.
- Enter your Association identification number.
- Enter your Additional association identification number.
- Indicate the member range of your association.
- Indicate the creation date of your association.
- Enter the information of the association's representative:
- Name
- First name
- Role within the association
- Phone number
- Email address
- Validate and submit
Check that all information is correct, then click the <em>Submit for validation</em> button. - Wait for validation
A consultant may contact you for additional information.<br>You will receive an email as soon as your association is eligible for a non-profit license.
Note: The validation of your association ensures that non-profit licenses are only granted to eligible organizations.
Information management
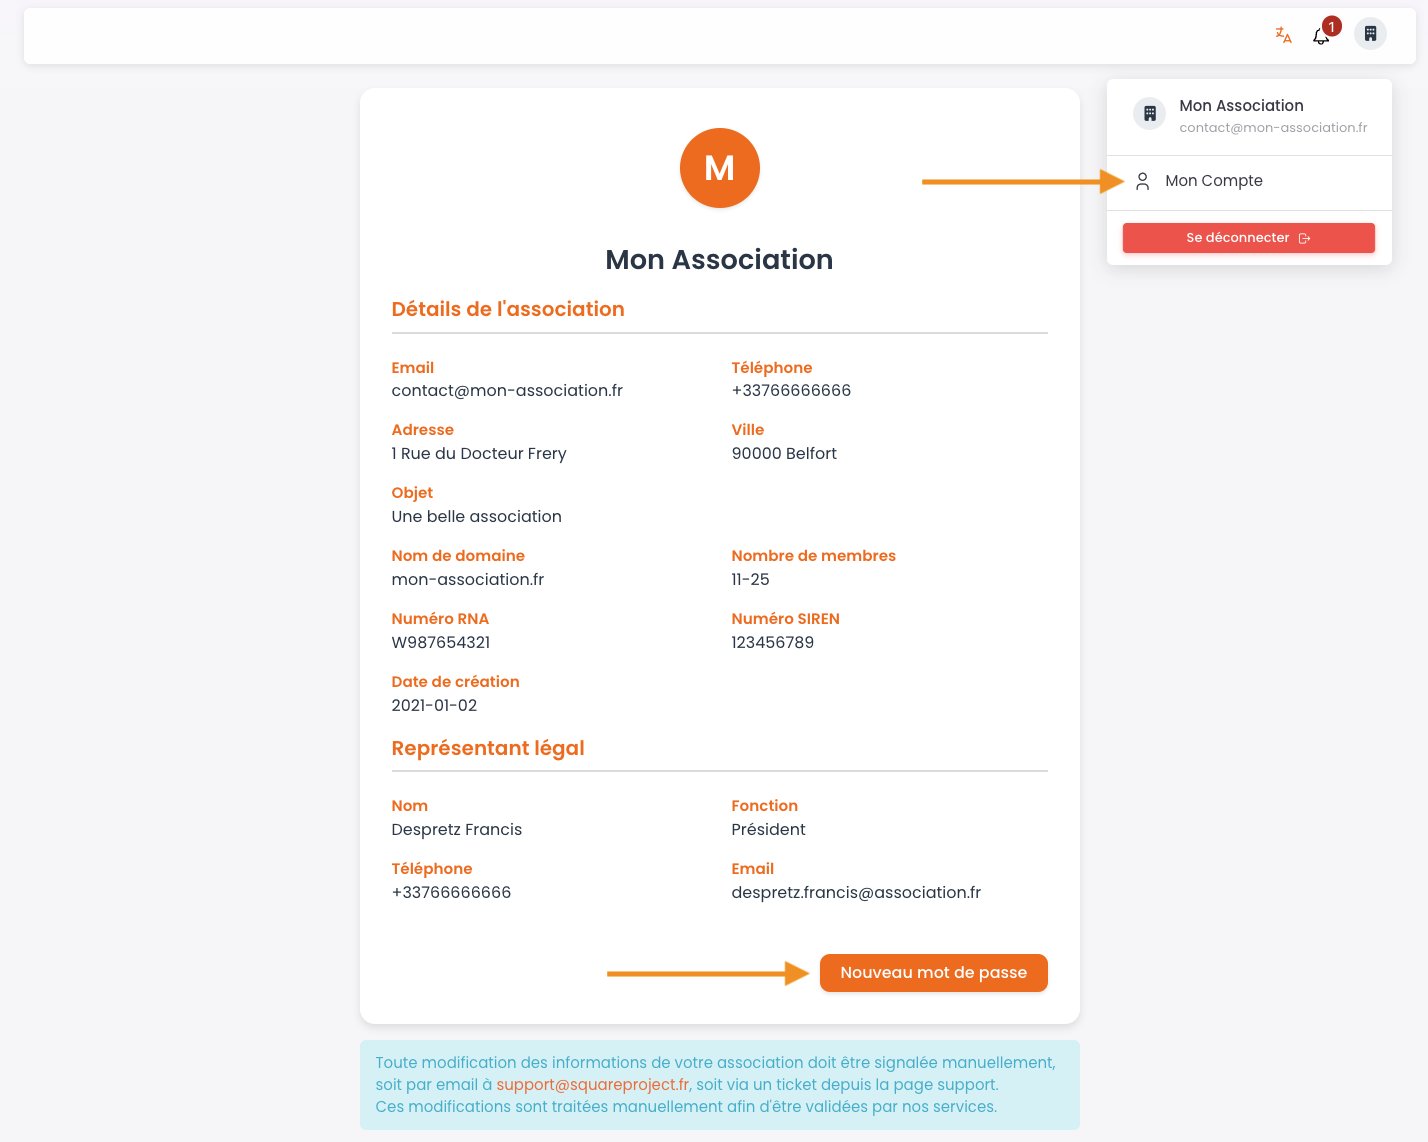
- Access your information
Go directly to the My account page. - Open the user menu
Click on the icon at the top right of the navigation bar, then click on the My account button. - View your information
On this page, you can view all the information about your association. - Reset your password
Click on New password. You will receive an email with a link to reset it. - To modify your information
Any modification of your association's information must be reported manually.
You can write to us by email at: support@squareproject.fr or open a ticket from the Support page.
Note: These changes are processed manually in order to be validated by our team.
Member management
-
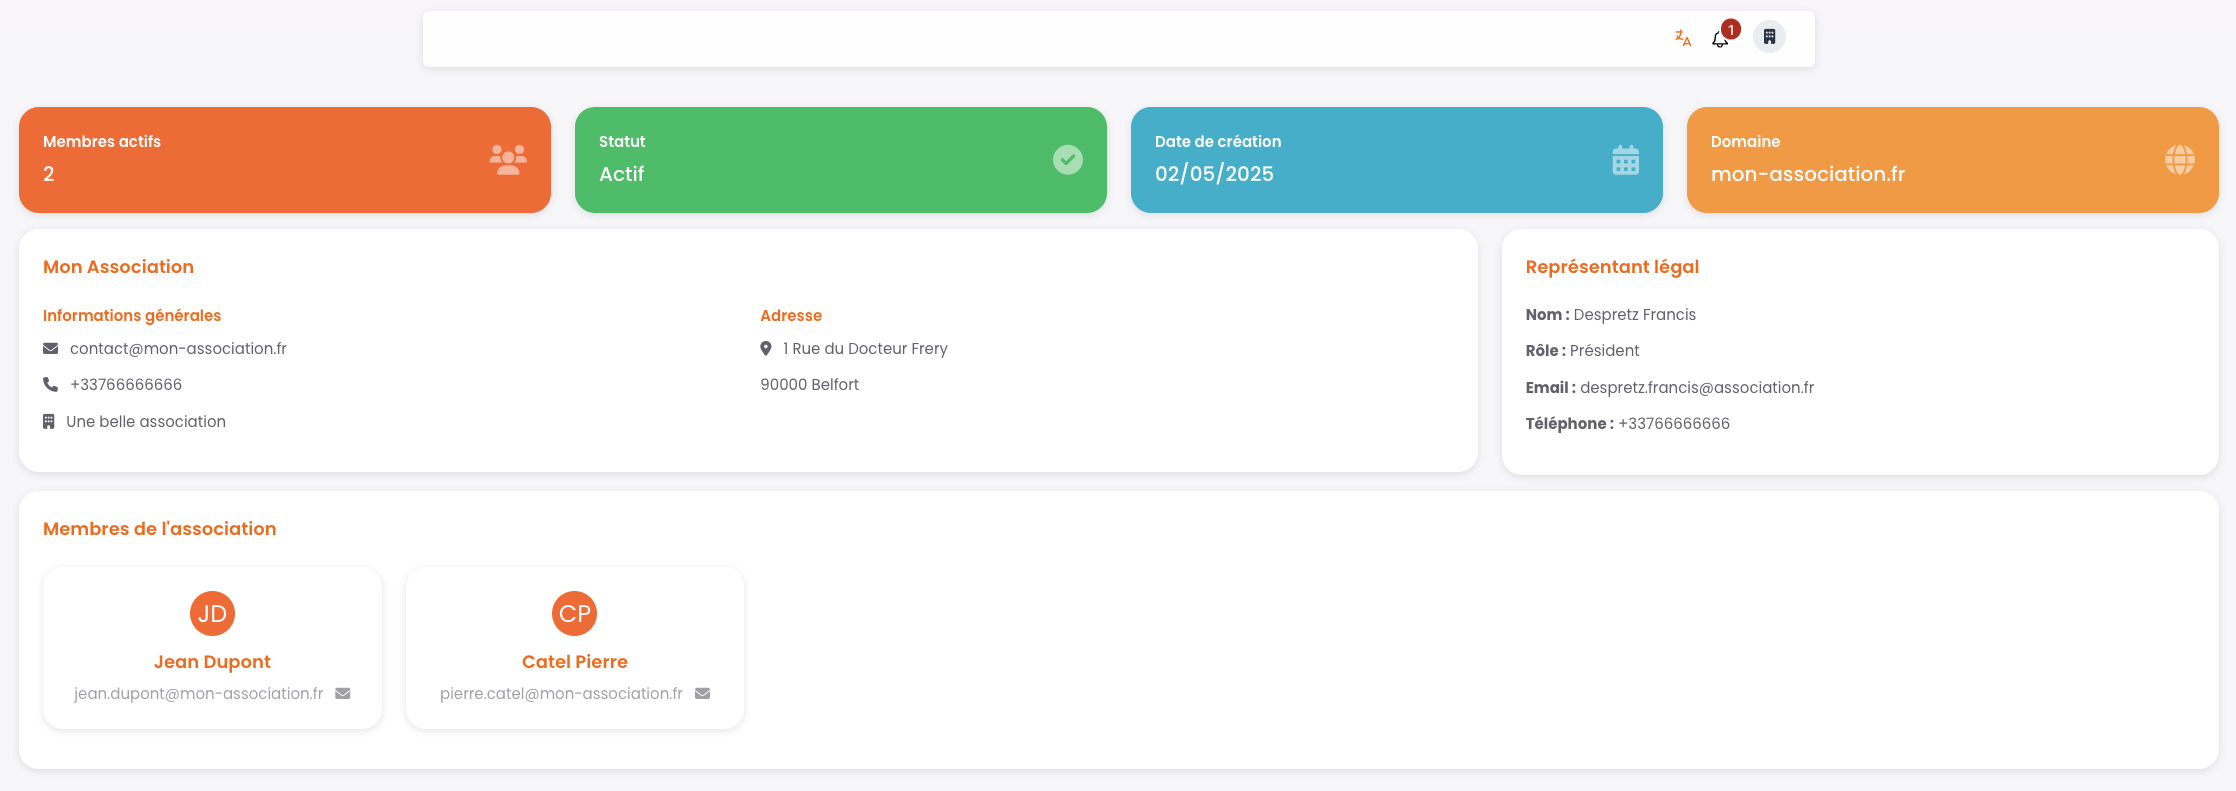
Automatic member detection
The members of your association are automatically detected thanks to your domain name.
To be recognized as a member, it is essential to register with an email address using this domain name.
Example: if your domain is my-association.com, the address must be of the type xxxxx@my-association.com. -
Automatic addition to the dashboard
When a new member registers with a valid address, they are automatically added to your dashboard. -
Support and assistance
For any questions or specific requests regarding your members, contact support by email at support@squareproject.fr or open a ticket from the Support page.
Ticket management
-
Access the Support page
If you encounter a difficulty or have a specific request, contact our services via the ticket tool.
To do this, go to the Support page by clicking on the link at the bottom right of any page. -
Create a new ticket
Click on the New ticket button, then fill in the required fields: indicate the subject of your request and write a detailed message. -
Follow-up and processing
Once your ticket is created, it will be handled quickly by our team.
You can check the status of your tickets at any time: new, being processed, or closed. -
Exchange with support
Each ticket results in a discussion with our support team.
It is our team that updates the status of your ticket: you don't have to do anything, we take care of everything.
Create a Professional account
-
Why create a company account?
By creating a company account, you can group license purchases for your employees.
This gives you a clearer view and simplified management of your purchases with Square Project.
You also benefit from consolidated billing: all your purchases are grouped into a single monthly invoice, a real time saver for your accounting. -
Start creating your account
On the login page, click on the Create an account link to open the registration form. -
Select 'Create a company account'
Click on Create a company account then fill in the required fields. -
Fill in the form
- Enter the exact company name of your business, as declared to the authorities.
- Enter your Company identification number.
- Provide your company's email address, phone number, and head office address.
- Choose a secure password.
-
Accept the terms and conditions
You can read our terms and conditions by clicking on the appropriate link, then check the box to accept them. -
Validate account creation
Click on the Create my account button. -
Activate your account
A validation link will be sent to you by email as soon as possible. It will allow you to activate your company account on Square Project.
Information management
-
Access your information page
Click the button at the top right of your screen, then on My account. -
View your information
All your information is displayed in the left column of this page. -
Edit your information
Click the Edit button, fill in or update the desired fields, then click Save changes. The changes are applied immediately. -
Request a new password
Click the appropriate button. An email will be sent to you to initialize your password, if you confirm this action. -
View your subscription and invoices
On the right side of the page, find your current subscription. Below, the list of your invoices: click on Actions to view each invoice.
You will be redirected to Stripe, where you can download your invoice and the corresponding receipt.
My subscription status
-
Access your subscription status
Click the appropriate button in the bar at the top of your screen. -
View your licenses
On this page, you can see the number of licenses available or already assigned. -
Manage your subscription
Just below, check the status of your subscription: you can cancel or modify it as needed. -
Invoices and payments
Find the list of your invoices: you can view, pay, and download them. -
License distribution
At the bottom of the page, manage the distribution of your active licenses among your collaborators. -
Update your subscription
If you don't have enough licenses, or if you have too many, you can adjust the desired quantity and update your subscription. -
Modification procedure
To subscribe or change the number of licenses, adjust the quantity, check the acceptance box for the terms, then click Update my subscription to validate. -
License usage
Licenses purchased by companies are intended to be distributed to user accounts, allowing them to use the platform.
Note: The pricing of new licenses will be billed pro rata for the remainder of the current monthly period.
License management
-
Manage your license distribution
From your dashboard, check the number of active licenses already distributed. -
Distribute a new license
Click on the Distribute a license button, search for your collaborator (name, first name or email), select them and indicate the number of licenses to assign. Then click on Distribute. -
License activation
Licenses become active immediately, provided your subscription covers all distributed licenses.Note: If the number of distributed licenses exceeds your subscription, all licenses will be suspended until adjustment. -
Modify or revoke licenses
To change the number of licenses assigned to a collaborator, click on the pencil icon and adjust the quantity.
To revoke all licenses from a user, click on the Delete button.
Ticket management
-
Access the Support page
If you encounter a difficulty or have a specific request, contact our services via the ticket tool.
To do this, go to the Support page by clicking on the link at the bottom right of any page. -
Create a new ticket
Click on the New ticket button, then fill in the required fields: indicate the subject of your request and write a detailed message. -
Follow-up and processing
Once your ticket is created, it will be handled quickly by our team.
You can check the status of your tickets at any time: new, being processed, or closed. -
Exchange with support
Each ticket results in a discussion with our support team.
It is our team that updates the status of your ticket: you don't have to do anything, we take care of everything.
Create a User account
-
Access the login page
From the login page, click on the 'Create an account' button. -
Select 'Personal account'
Click on 'Create a personal account' to access the registration form. -
Fill in the form
Enter the requested information:- Your last name
- Your first name
- Your email address
- Your phone number
- Your address
- A secure password (at least 8 characters)
-
Accept the terms and conditions
Read the terms and conditions by clicking on the provided link, then check the box 'I acknowledge having read and accepted the terms and conditions.' -
Finalize your registration
Click on 'Create an account' to complete the registration. -
Activate your account
A confirmation email will be sent to you. Click on the link it contains to activate your user account. -
Log in
You can now log in and start using the Square Project platform.
Information management
-
Access your information
Click on your avatar at the top right of the screen, then on the 'My account' button. -
View your personal information
All your information is displayed on the left side of the page. -
Edit your information
Click on the 'Edit' button. Changes will be applied as soon as you click 'Save changes.' -
Request a new password
An email will be sent to you to initialize your password, if you confirm this action. -
Change your avatar
Click on your avatar at the top of the card, select a file on your computer, redefine the area to display, then confirm your selection. -
View your subscription and licenses
On the right side of the page, check the status of your current subscription and the number of licenses you have. -
View and download your invoices
Find the list of your invoices, which you can view and download by clicking on the 'Action' icon. -
View your issued licenses
Check the licenses issued by companies: active, revoked, or pending. -
Manage your notification preferences
On the left, you will also find your notification preferences.
License management
-
Access your subscription information
Click on the appropriate button in the top bar of your space. -
Non-profit licenses
If you are affiliated with an association eligible for our non-profit license program, thanks to your domain name, a non-profit license will be automatically assigned to you. -
Your subscription status
Otherwise, you can check the status of your subscription. This includes:- The number of personal licenses you have subscribed to with Square Project
- The number of licenses that have been assigned to you by third parties, especially by companies
-
Access to environments
This total number of licenses defines the environments you have access to. You can therefore see:- The number of accesses you are currently using
- The total number available
-
Update subscription
To update your subscription, click on the <em>Update subscription</em> button. -
License management
On this page, you can check:- The number of licenses you own
- How licenses work on Square Project
-
Validate changes
- Read our terms and conditions by clicking on the provided links
- Check the box 'I acknowledge having read and accepted the terms and conditions'
- Click on Update my subscription to validate
Note: The amount of your new subscription will be billed pro rata for the remaining time in your current monthly period.
Notification management
-
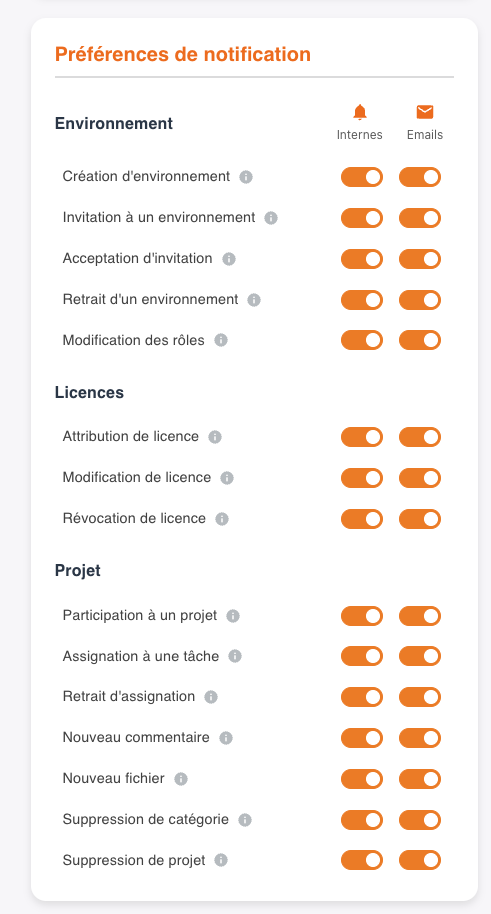
Access notification management
Go to the My account page.
Click on the appropriate button in your personal menu, at the top right of your space. -
Open notification settings
The settings are located in a box at the bottom left of the page. -
Choose the types of notifications to enable
For each type of notification, you can enable or not:- internal notifications, indicated by a small bell ,
- and the receipt of emails associated with each event.
-
Adjust according to your preferences
These options allow you to adjust alerts according to your personal preferences.
Create an environment
-
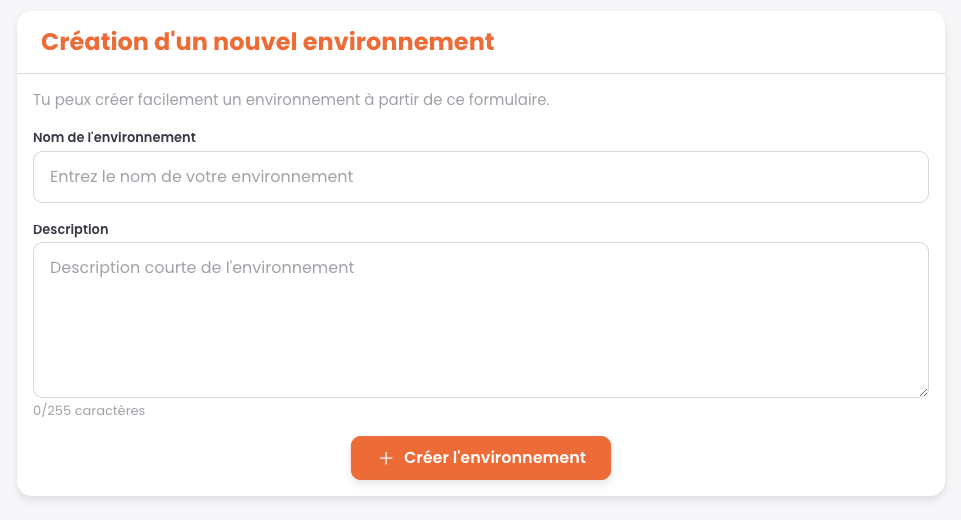
Access environment creation
From your dashboard, click on the Add environment button. -
Enter information
Enter the name of your environment and a short description (255 characters max). -
Become administrator
When you create an environment, you automatically become its administrator and have all rights. -
Add administrators and members
Later, you can designate other administrators and invite additional members to join this environment. -
Leave an environment
A creator can leave an environment provided there is at least one other administrator. -
Environment independence
Environments are not the property of their creator or main administrator. They are designed to be totally independent once created, and can continue to operate without their original creator.
Join an environment
-
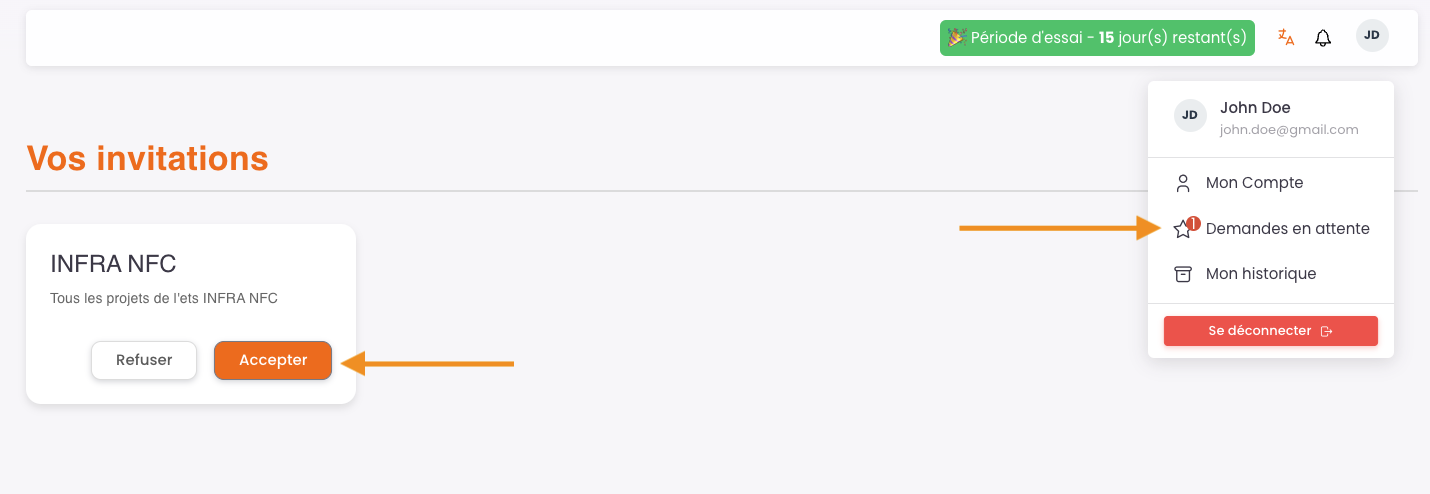
Receive an invitation
The only way to join an existing environment is to receive an invitation from an authorized person. -
Check your invitations
Click on your avatar at the top right of the screen, then select the Pending requests button. -
Manage your invitations
On this page, you will find all the invitations you can accept or decline. -
Accept an invitation
Once you accept an invitation, access to the relevant environment is immediately activated.
Environment settings
-
Access your environment
From your dashboard, access your environment either by clicking on the tiles on the screen, or by selecting its name from the dropdown list at the top left. -
Open settings
Once in the environment, click the Configure environment button in the Settings menu. -
Edit information
From this page, you can:- edit the environment name,
- adjust the short description,
- and write a full description using our rich text editor.
-
Save your changes
To validate your changes, click on Save changes. -
Delete environment
You can also delete the environment.
Warning: This action has important consequences:
– All files in your projects will be immediately deleted from our servers.
– The environment will become inaccessible for 30 days.
– In case of accidental deletion, you can reactivate it by making a request to support.
– After this 30-day period, the environment will be permanently deleted, with no possibility of recovery.
Manage project types
-
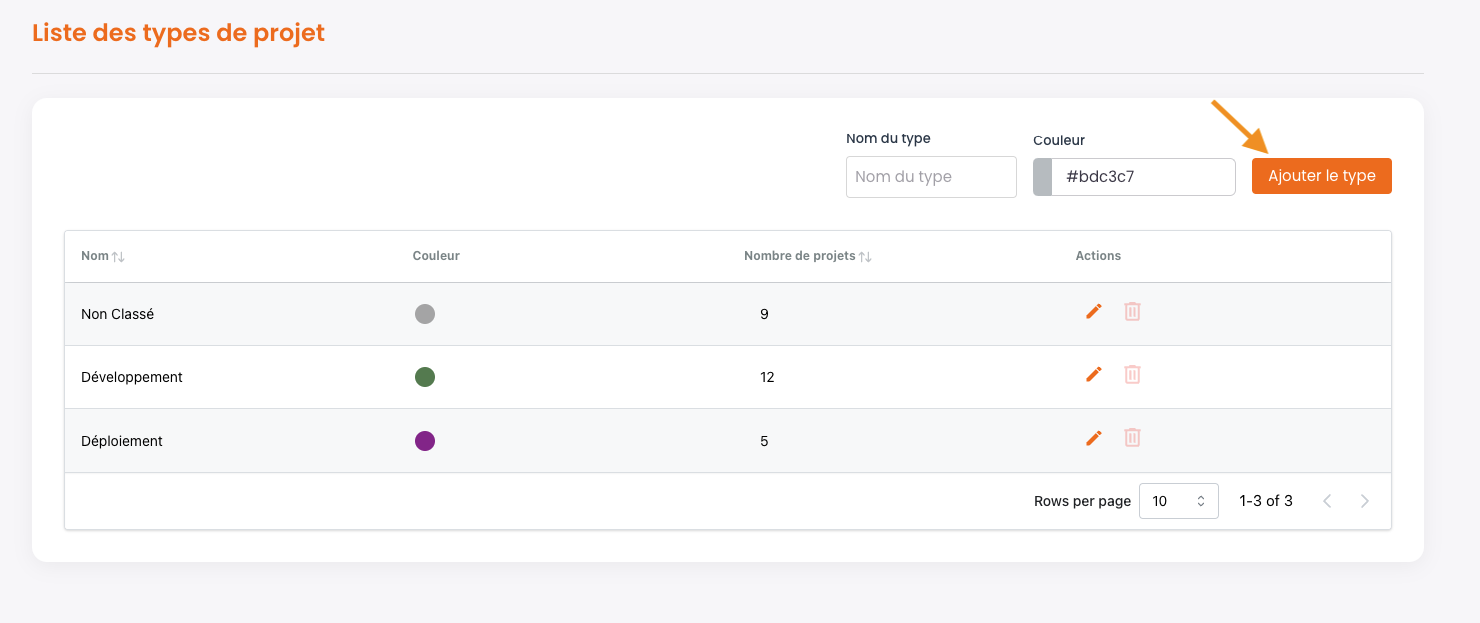
Manage project types
By clicking the Project type button in the Settings menu, you access the project types management area. -
Classify and organize your projects
Types allow you to efficiently classify and organize the projects you will create. -
Add a type
Enter its name in the designated field, choose a representative color, then click Add type.
The type will be immediately added to the list of existing types. -
Edit or delete a type
You can edit a type at any time by clicking the Pencil icon (to change its name or color).
A type can also be deleted, provided it contains no projects. -
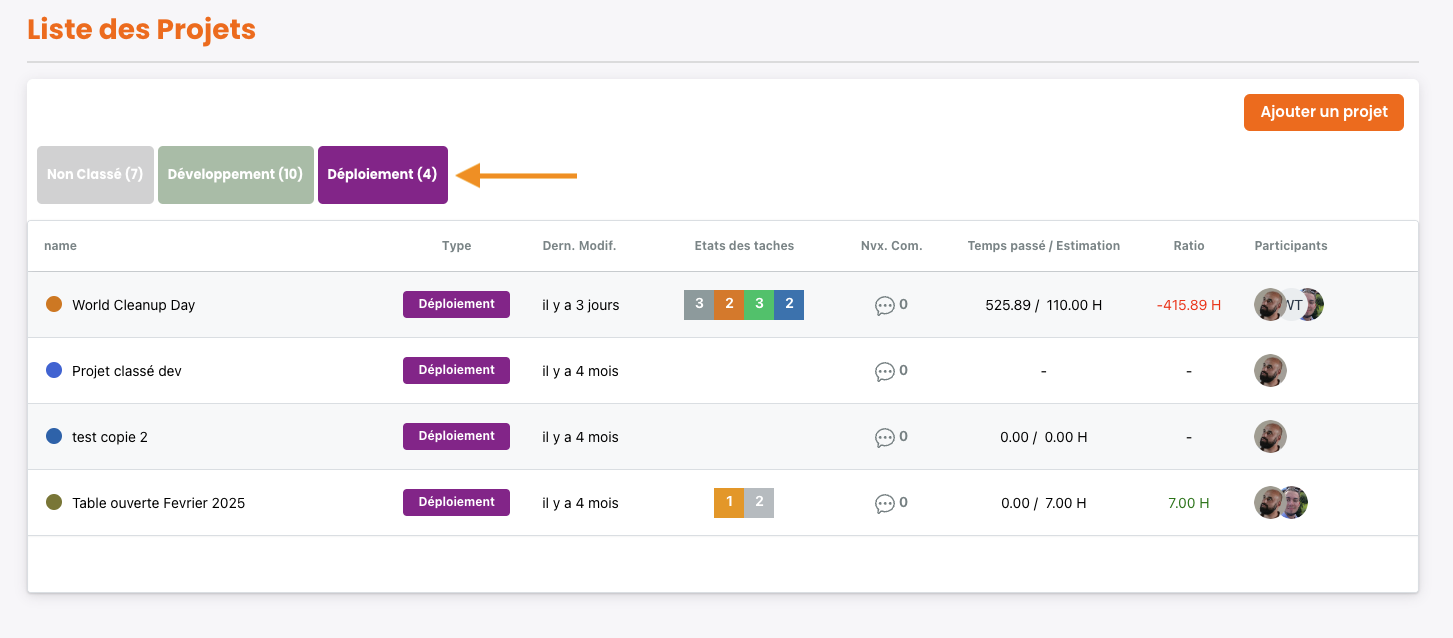
Use types when creating and filtering
When creating a new project, you can select the type it belongs to.
In your project list, you can then enable or disable filters by clicking on the type tiles. This allows you to display only the projects associated with the selected types.
Manage my members
-
support.documentation.manageMembersSteps.accessMembersManagement
support.documentation.manageMembersSteps.accessMembersManagementDescription -
support.documentation.manageMembersSteps.viewMembersList
support.documentation.manageMembersSteps.viewMembersListDescription -
support.documentation.manageMembersSteps.addMember
support.documentation.manageMembersSteps.addMemberDescription -
support.documentation.manageMembersSteps.assignAccessRights
support.documentation.manageMembersSteps.assignAccessRightsDescription -
support.documentation.manageMembersSteps.sendInvitation
support.documentation.manageMembersSteps.sendInvitationDescription -
support.documentation.manageMembersSteps.modifyRightsOrPresence
support.documentation.manageMembersSteps.modifyRightsOrPresenceDescription -
support.documentation.manageMembersSteps.leaveEnvironment
support.documentation.manageMembersSteps.leaveEnvironmentDescription
Create a project
-
support.documentation.createProjectSteps.addProject
support.documentation.createProjectSteps.addProjectDescription -
support.documentation.createProjectSteps.enterMainInformation
support.documentation.createProjectSteps.enterMainInformationDescription -
support.documentation.createProjectSteps.selectTypeAndParticipants
support.documentation.createProjectSteps.selectTypeAndParticipantsDescription -
support.documentation.createProjectSteps.useTemplate
support.documentation.createProjectSteps.useTemplateDescription -
support.documentation.createProjectSteps.configureProject
support.documentation.createProjectSteps.configureProjectDescription -
support.documentation.createProjectSteps.validateSettings
support.documentation.createProjectSteps.validateSettingsDescription -
support.documentation.createProjectSteps.manageProjectStatuses
support.documentation.createProjectSteps.manageProjectStatusesDescription -
support.documentation.createProjectSteps.assignRightsToParticipants
support.documentation.createProjectSteps.assignRightsToParticipantsDescription -
support.documentation.createProjectSteps.finalizeCreation
support.documentation.createProjectSteps.finalizeCreationDescription
Import an external project
-
support.documentation.importProjectSteps.importFromExternalPlatforms
support.documentation.importProjectSteps.importFromExternalPlatformsDescription -
support.documentation.importProjectSteps.startImport
support.documentation.importProjectSteps.startImportDescription -
support.documentation.importProjectSteps.prepareImport
support.documentation.importProjectSteps.prepareImportDescription -
support.documentation.importProjectSteps.selectExternalPlatform
support.documentation.importProjectSteps.selectExternalPlatformDescription -
support.documentation.importProjectSteps.importFromMonday
- support.documentation.importProjectSteps.importFromMondayStep1
- support.documentation.importProjectSteps.importFromMondayStep2
- support.documentation.importProjectSteps.importFromMondayStep3
- support.documentation.importProjectSteps.importFromMondayStep4
-
support.documentation.importProjectSteps.finalizeImport
support.documentation.importProjectSteps.finalizeImportDescription
How projects work
support.documentation.projectFunctionningSteps.generalFunctionning
-
support.documentation.projectFunctionningSteps.accessGeneralInformation
support.documentation.projectFunctionningSteps.accessGeneralInformationDescription -
support.documentation.projectFunctionningSteps.modifyProjectSettings
support.documentation.projectFunctionningSteps.modifyProjectSettingsDescription -
support.documentation.projectFunctionningSteps.organizeWithCategories
support.documentation.projectFunctionningSteps.organizeWithCategoriesDescription -
support.documentation.projectFunctionningSteps.createAndManageTasks
support.documentation.projectFunctionningSteps.createAndManageTasksDescription -
support.documentation.projectFunctionningSteps.trackProgressAndCollaborate
support.documentation.projectFunctionningSteps.trackProgressAndCollaborateDescription
support.documentation.projectFunctionningSteps.taskFunctionning
-
support.documentation.projectFunctionningSteps.addAndModifyTasks
support.documentation.projectFunctionningSteps.addAndModifyTasksDescription -
support.documentation.projectFunctionningSteps.manageTaskOptions
support.documentation.projectFunctionningSteps.manageTaskOptionsDescription -
support.documentation.projectFunctionningSteps.accessTaskDetails
support.documentation.projectFunctionningSteps.accessTaskDetailsDescription -
support.documentation.projectFunctionningSteps.useWorkViews
support.documentation.projectFunctionningSteps.useWorkViewsDescription -
support.documentation.projectFunctionningSteps.analyzeIndicators
support.documentation.projectFunctionningSteps.analyzeIndicatorsDescription
Work session management
-
support.documentation.projectSessionsSteps.activateAndUseSessions
support.documentation.projectSessionsSteps.activateAndUseSessionsDescription -
support.documentation.projectSessionsSteps.viewSessionCalendar
support.documentation.projectSessionsSteps.viewSessionCalendarDescription -
support.documentation.projectSessionsSteps.accessSessionsFromCategory
support.documentation.projectSessionsSteps.accessSessionsFromCategoryDescription -
support.documentation.projectSessionsSteps.billingRatio
support.documentation.projectSessionsSteps.billingRatioDescription -
support.documentation.projectSessionsSteps.globalSessionCalendar
support.documentation.projectSessionsSteps.globalSessionCalendarDescription
Gantt chart management
support.documentation.projectGanttSteps.generalFunctionning
-
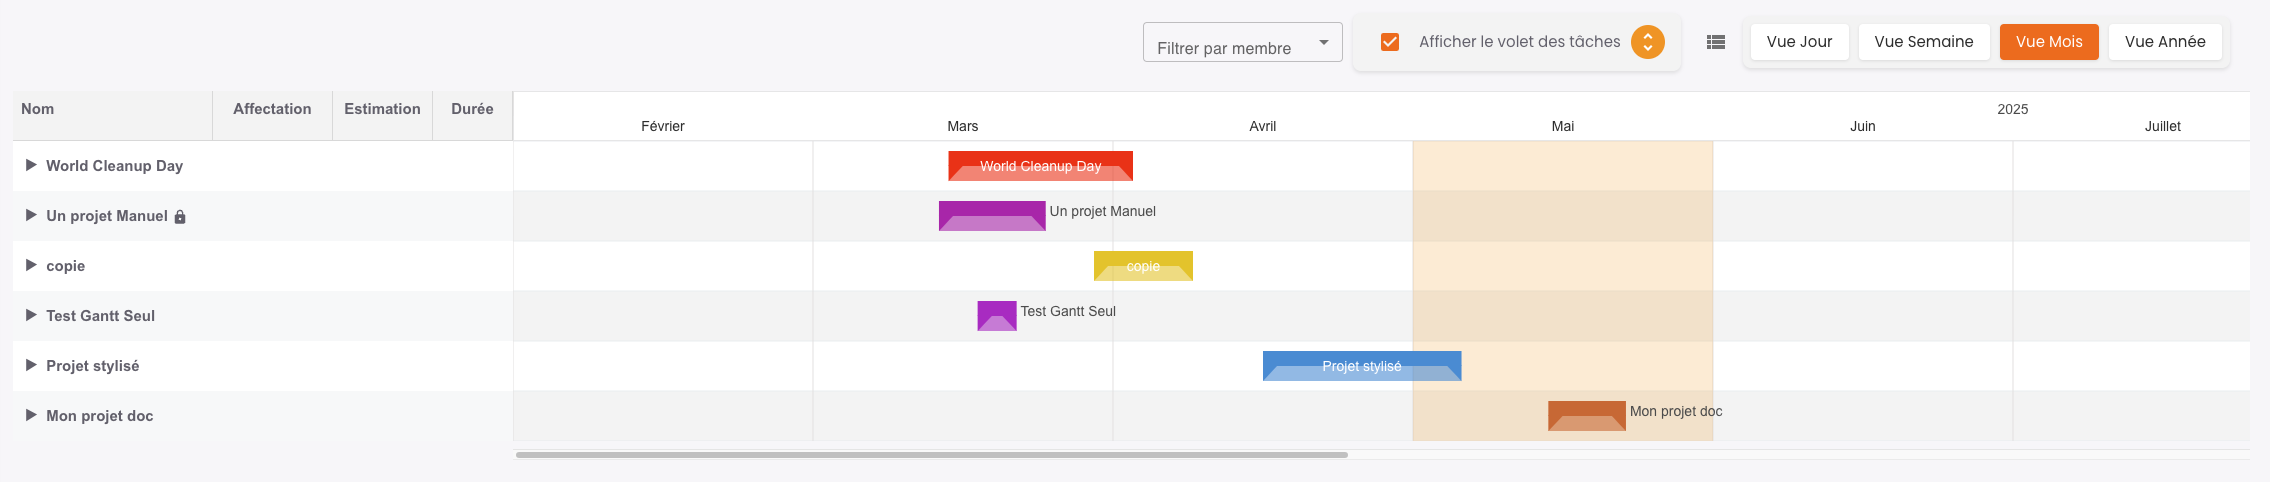
support.documentation.projectGanttSteps.accessGanttChart
support.documentation.projectGanttSteps.accessGanttChartDescription -
support.documentation.projectGanttSteps.customizeDisplay
support.documentation.projectGanttSteps.customizeDisplayDescription -
support.documentation.projectGanttSteps.addAndScheduleTasks
support.documentation.projectGanttSteps.addAndScheduleTasksDescription -
support.documentation.projectGanttSteps.modifyAndOrganizeTasks
support.documentation.projectGanttSteps.modifyAndOrganizeTasksDescription
support.documentation.projectGanttSteps.advancedFunctionning
-
support.documentation.projectGanttSteps.taskDependencyLinks
support.documentation.projectGanttSteps.taskDependencyLinksDescription -
support.documentation.projectGanttSteps.projectStartDate
support.documentation.projectGanttSteps.projectStartDateDescription -
support.documentation.projectGanttSteps.manageHoursAndDurations
support.documentation.projectGanttSteps.manageHoursAndDurationsDescription
support.documentation.projectGanttSteps.capacityMode
-
support.documentation.projectGanttSteps.filterByMember
support.documentation.projectGanttSteps.filterByMemberDescription -
support.documentation.projectGanttSteps.workloadVisualization
support.documentation.projectGanttSteps.workloadVisualizationDescription -
support.documentation.projectGanttSteps.reorganizeTasks
support.documentation.projectGanttSteps.reorganizeTasksDescription -
support.documentation.projectGanttSteps.workloadCalculation
support.documentation.projectGanttSteps.workloadCalculationDescription
support.documentation.projectGanttSteps.globalView
support.documentation.projectGanttSteps.globalViewDescription
File management
support.documentation.projectFilesSteps.addFilesLevels
-
support.documentation.projectFilesSteps.addFileToProject
support.documentation.projectFilesSteps.addFileToProjectDescription -
support.documentation.projectFilesSteps.addFileToCategory
support.documentation.projectFilesSteps.addFileToCategoryDescription -
support.documentation.projectFilesSteps.addFileToTask
support.documentation.projectFilesSteps.addFileToTaskDescription
support.documentation.projectFilesSteps.note
External sharing
-
support.documentation.projectSharingSteps.accessSharingOption
support.documentation.projectSharingSteps.accessSharingOptionDescription -
support.documentation.projectSharingSteps.createSharingLink
support.documentation.projectSharingSteps.createSharingLinkDescription -
support.documentation.projectSharingSteps.generalSharingOptions
support.documentation.projectSharingSteps.generalSharingOptionsDescription -
support.documentation.projectSharingSteps.selectCategoriesToInclude
support.documentation.projectSharingSteps.selectCategoriesToIncludeDescription -
support.documentation.projectSharingSteps.filterTasksToDisplay
support.documentation.projectSharingSteps.filterTasksToDisplayDescription -
support.documentation.projectSharingSteps.customizeVisibleColumns
support.documentation.projectSharingSteps.customizeVisibleColumnsDescription -
support.documentation.projectSharingSteps.shareSessionsAndComments
support.documentation.projectSharingSteps.shareSessionsAndCommentsDescription -
support.documentation.projectSharingSteps.configureRecipientsAndDuration
support.documentation.projectSharingSteps.configureRecipientsAndDurationDescription -
support.documentation.projectSharingSteps.manageExistingSharingLinks
support.documentation.projectSharingSteps.manageExistingSharingLinksDescription -
support.documentation.projectSharingSteps.verifySharingOutput
support.documentation.projectSharingSteps.verifySharingOutputDescription
Text editor feature
-
support.documentation.textEditorSteps.createTextFile
support.documentation.textEditorSteps.createTextFileDescription -
support.documentation.textEditorSteps.blockFunctionality
support.documentation.textEditorSteps.blockFunctionalityDescription -
support.documentation.textEditorSteps.optionsAndFeatures
support.documentation.textEditorSteps.optionsAndFeaturesDescription -
support.documentation.textEditorSteps.closeAndReopenEditor
support.documentation.textEditorSteps.closeAndReopenEditorDescription -
support.documentation.textEditorSteps.integratedEditor
support.documentation.textEditorSteps.integratedEditorDescription
Diagram editor feature
-
support.documentation.diagramEditorSteps.createDiagramFile
support.documentation.diagramEditorSteps.createDiagramFileDescription -
support.documentation.diagramEditorSteps.useDiagramEditor
support.documentation.diagramEditorSteps.useDiagramEditorDescription -
support.documentation.diagramEditorSteps.addAdvancedElements
support.documentation.diagramEditorSteps.addAdvancedElementsDescription -
support.documentation.diagramEditorSteps.highlightPreferredPath
support.documentation.diagramEditorSteps.highlightPreferredPathDescription -
support.documentation.diagramEditorSteps.classicEditorFeatures
support.documentation.diagramEditorSteps.classicEditorFeaturesDescription -
support.documentation.diagramEditorSteps.closeAndReopenEditor
support.documentation.diagramEditorSteps.closeAndReopenEditorDescription
Ticket management
-
support.documentation.ticketManagementUserSteps.accessSupportPage
support.documentation.ticketManagementUserSteps.accessSupportPageDescription -
support.documentation.ticketManagementUserSteps.createNewTicket
support.documentation.ticketManagementUserSteps.createNewTicketDescription -
support.documentation.ticketManagementUserSteps.followUpAndProcessing
support.documentation.ticketManagementUserSteps.followUpAndProcessingDescription -
support.documentation.ticketManagementUserSteps.exchangeWithSupport
support.documentation.ticketManagementUserSteps.exchangeWithSupportDescription